

Learning how to establish a kitchen garden is a build sequence, not a shopping list: clear the site, raise the beds, feed the soil, lay the water, then plant in order. Most guides stop at a layout drawing. This one walks the whole build in order, bare soil first and the first harvest last, so a beginner can finish a working plot in a weekend and keep it cropping for months.
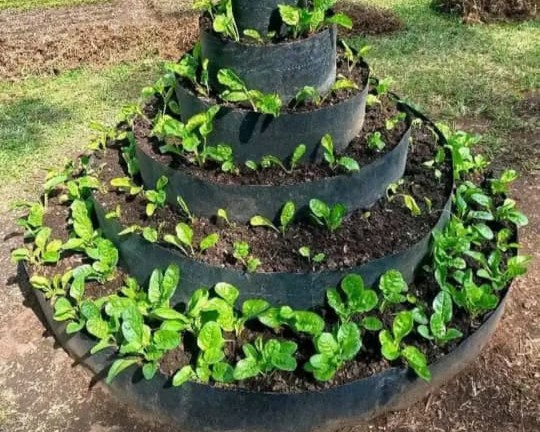
How to Establish a Kitchen Garden: Step 1, Choose and Clear the Site
First pick ground with six hours of direct sun and water within a short pipe run. A tap, tank or well nearby saves daily carrying. Next clear grass, roots and rubble from the plot, because weeds left under a bed regrow through it. Therefore spend the first morning on clearing, not planting.
Mark the whole plot before digging any bed. Peg the corners and string the outer edge so you can see the paths and the beds together. In practice a 5 m by 5 m yard grows all the greens and fruiting crops a household eats. Knowing how to establish a kitchen garden starts here, with the site measured and cleared, not with seed in hand.
Step 2: Mark Out and Raise the Beds
Keep every bed a metre across so both halves are workable from the path and feet never touch the growing surface. Space beds with 40 cm walking gaps and a 60 cm lane at the head where the barrow turns. Then lift the bed 20 to 30 cm above the path, using dug soil or a ring of boards or blocks.
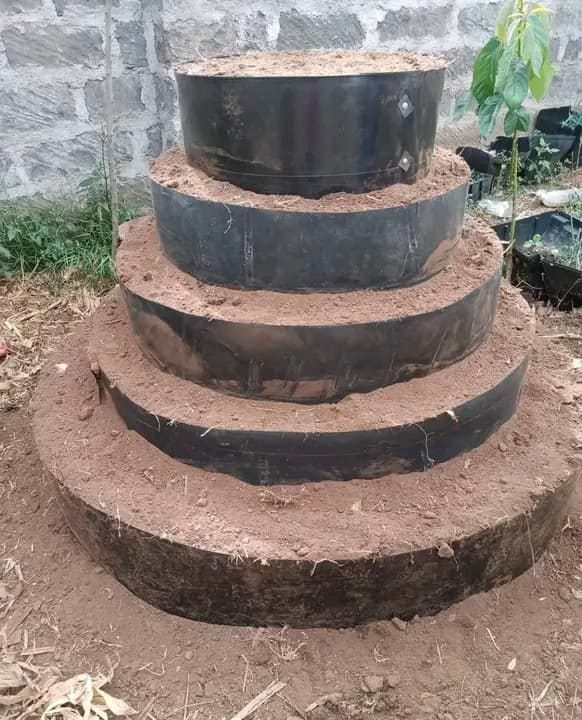
Raising pays on poor or waterlogged ground because the root zone drains and you control the fill. However it costs more edge material than a flat bed. For a tight yard, a tiered ring stacks several planting circles on one square metre. Whatever the shape, keep the bed narrow enough to work from the path.
Step 3: Feed, Level and Settle the Soil
Work compost or well-rotted manure into the top 20 cm of each bed before planting. Because a kitchen garden crops heavily from a small area, feeding early is central to how to establish a kitchen garden that lasts. Then rake the surface level and break lumps, because seed sits evenly only on a fine, flat tilth.
Water the filled beds and let them settle for a day or two before sowing. Freshly dug soil sinks after the first wetting, and planting into it leaves seed at uneven depth. Therefore settle first, top up any hollows, and rake again. This quiet step is what separates an even stand from a patchy one.
Step 4: Lay the Water Line Before You Plant
Fit the water side before seed goes in, so you never walk on planted rows to lay pipe. Run a mainline along the head path from a raised tank or tap, and put a screen filter at the outlet to keep grit out of the emitters. Then branch one lateral per bed with a starter connector at each take-off.
Flush every line before closing the ends, then fit end plugs so pressure holds. A gravity tank needs only a metre or two of height to push water through drip tape. Consequently the whole plot waters from one tap turn, not a bucket round. Lay it once, correctly, and the daily work shrinks to minutes.
Step 5: Plant in Sequence for a Steady Harvest
Do not sow every bed on one day. Stagger plantings a week or two apart so harvests arrive in sequence instead of all at once. Start fast leaves like sukuma wiki and spinach, then follow with tomatoes and onions that take longer. Therefore the kitchen yields something every week from the first month.
Raise slow crops in a small nursery tray and transplant once they have a few true leaves; direct-sow fast ones into the settled bed. Space plants to their mature width, not their seedling size, because crowded plants stay small and disease spreads. In practice sequence planting is the difference between a glut and a steady supply.
Step 6: Mulch, Water and Watch the First Week
Spread a thin mulch of dry grass or leaves over each bed after planting. Mulch holds moisture, cools the root zone and blocks the weeds you cleared in step 1. Then water lightly every day for the first week, because germinating seed must never dry out. A drip line on a short daily run does this without washing seed away. Getting this week right is the core of how to establish a kitchen garden successfully.
Watch the first week closely and replace any patch that fails to germinate. However once seedlings establish, shift to longer, less frequent runs so roots grow down. Mulch plus drip means the bed stays moist between runs. This is the stage where most new gardens fail, so keep the water steady until plants stand on their own.
Step 7: Harvest, Replant and Keep the Cycle Going
Pick leaves from the outside of the plant so the centre keeps growing, and harvest fruiting crops as they ripen rather than all at once. Then replant every empty row the same week, because a bare bed is wasted space and a weed seedbed. Therefore the garden stays in continuous production instead of finishing in one flush.
Feed lightly after each harvest and top up mulch as it thins. Rotate families between beds where space allows, so soil-borne disease does not build up in one spot. Knowing how to establish a kitchen garden includes this last habit: the plot is a cycle, not a one-off project, and replanting is what keeps it paying.
A Weekend Timeline: How to Establish a Kitchen Garden Fast
The seven steps of how to establish a kitchen garden fit a weekend for the build and a month for the first pick. The table sets the order and the check that tells you each stage is done. Work top to bottom; do not plant before the water line is flushed.
| When | Task | Done when |
|---|---|---|
| Day 1, morning | Clear and mark the site | Corners pegged, weeds and rubble removed |
| Day 1, afternoon | Build and fill the beds | Beds 1 m wide, raised 20 to 30 cm |
| Day 2, morning | Feed, level, settle | Compost worked in, surface raked fine |
| Day 2, afternoon | Lay and flush the water line | Filter fitted, ends closed, no leaks |
| Day 3 | Plant in sequence and mulch | Fast leaves sown, mulch spread thin |
| Week 1 | Water daily, watch germination | Even stand, failed patches resown |
| Weeks 2 to 4 | Thin, feed, first pick | First leaves harvested, empty rows replanted |
Build in a weekend, first pick in a month; each row carries its own completion check.
The Shop Table for Each Establishment Step
| Establishment step | What it needs | Stocked part |
|---|---|---|
| Head and stored water (any step) | Gravity pressure | – |
| Step 4, pipe down the head lane | Carries water to all beds | Irrigation pipes |
| Step 4, trap grit before emitters | Screen at the tank outlet | Screen filter |
| Step 4, one take-off per bed | Sealed branch joints | Starter connector |
| Step 4, wet each row | Row-length wetting | Drip tape |
| Step 5, gentle wetting for seedbeds | No seed wash | Rain hose |
| Steps 5 and 6, one emitter per pot or ring | Even share per plant | Adjustable button drippers |
| Step 6, zone on and off | One valve per zone | Drip valve |
| Step 4, cap each lateral tail | Keeps pressure in | End plugs |
| Step 6, stop tank overflow | No wasted water | Ball cork |
A single shop part per step; the water store and its stand are the only off-site items.
Frequently Asked Questions: How to Establish a Kitchen Garden
How long does it take to establish a kitchen garden?
The build fits a weekend: clear and mark on day 1, beds and water on day 2, plant and mulch on day 3. The first leaf harvest follows in three to four weeks, so a month separates bare ground and the first picking.
What size plot should a beginner start with?
Start with a 5 m square: four metre-wide, three-metre-long beds plus paths give roughly 12 m² of planting. That feeds a household’s greens and fruiting crops yet stays small enough to water and weed alone.
Must I lay the drip line before planting?
Yes. Lay and flush the mainline and laterals before seed goes in, so you never walk on planted rows to fit pipe. Closing the ends after flushing holds pressure and keeps grit out of the emitters.
Why do seeds fail in the first week?
Usually because the surface dries between waterings. Germinating seed must stay moist, so water lightly every day for the first week and mulch to hold it. A short daily drip run does this without washing seed away.
Can I establish on poor or waterlogged soil?
Yes, by raising the bed 20 to 30 cm and filling it with good soil and compost. A raised or tiered ring drains the root zone and lets you control the fill, where a flat bed would stay sour or waterlogged.
How do I keep it cropping after the first harvest?
Replant every empty row the same week, feed lightly after each pick, and top up mulch as it thins. Staggered planting plus prompt replanting turns one flush into a steady weekly supply.
Once the beds crop, our kitchen garden guide covers the wider setup, soil and crop plan, while the drip irrigation systems in Kenya page handles the water design in depth. Compare parts against the purchase checklist on our irrigation equipment suppliers page before ordering, or take the whole small-plot set as one kitchen garden drip kit. For method background, read the Wikipedia entries on kitchen gardens and raised bed gardening.