

Table of Contents
Tomato farming has changed shape in Kenya over the last decade. Drip lines, certified hybrids and simple shade structures have turned a market-garden crop into a planned enterprise. The same three inputs decide whether a block pays: the variety, the water, and the seedling the crop starts from.
This guide follows one crop through a full season, from the nursery bed to the last pick. Each stage below carries a check you can apply on your own plot before you spend money on it.
Why tomato farming works in Kenya
Tomatoes run a short cycle. Most hybrids sold here mature 75 to 85 days after transplanting, so a farmer with reliable water can fit two crops into one year. That turnaround is the reason tomato farming spreads faster than most field crops.
The crop also answers well to drip. Water and fertiliser reach the root zone together, the foliage stays dry, and the grower stops guessing. For the equipment side of that decision, the drip system cost guide sets out what a one-acre layout runs to.
First, climate fits most of the country. Day temperatures between 20 and 25 degrees Celsius, nights between 15 and 17 degrees, and altitudes up to 2,000 metres all suit the crop. Typically, rainfall of about 600 mm a year is the usual floor for an open field without irrigation.
Tomato farming varieties: determinate and indeterminate
Every variety choice in tomato farming falls into one of two habits. Specifically, a determinate variety stops growing when fruit begins to form at the top bud. It reaches roughly 80 to 100 cm, holds a strong stem and usually needs no propping. An indeterminate variety keeps shooting and keeps setting fruit until drought, disease or cold stops it.
| Trait | Determinate | Indeterminate |
|---|---|---|
| Growth habit | Stops when the top bud fruits | Grows and sets all season |
| Plant height | About 80 to 100 cm | Often above 1.5 m when staked |
| Harvest pattern | One heavy, concentrated pick | Repeated picks over weeks |
| Support needed | Rarely | Sticks, strings or trellis |
| Best fit | Open field, one delivery to market | Greenhouse or steady weekly supply |
| Examples grown in Kenya | Rio Grande, Assila F1, Kilele F1, Cal J, Eden F1, Rambo F1 | Anna F1, Prostar F1 |
Seed catalogues for these open-field hybrids quote yields from about 12 to 35 tonnes per acre. Read the upper figures as trial-plot ceilings on a staked, full-season crop, never as a budget for your first block.
Four things decide the pick: disease tolerance, whether the seed is open-pollinated or hybrid, the fruit colour, shape and skin hardness, and your own labour and land. Tolerance to yellow leaf curl, bacterial wilt, nematodes and Fusarium wilt matters most where the ground has grown tomatoes before.
Step 1: Choose the variety for your altitude and market
First, match the habit to the delivery. A grower sending one truckload to a market after a single harvest wants a determinate crop that ripens together. Similarly, a grower supplying a vendor every week wants an indeterminate crop and a stake.
Then match the fruit to the distance. A hard-skinned oval fruit such as Assila F1 survives a long haul with less loss than a soft round one. Local sales change that maths, because a soft fruit that sells the same day needs no transport tolerance.
Finally match the seed to the season. A hybrid costs more per gram, and that price buys germination and tolerance you cannot get from saved seed. Record the lot and the sowing date on the bed, because a failed block is far harder to diagnose without it.
Step 2: Raise a uniform nursery
Tomato farming lives or dies in the nursery. Because the bed sets the whole season, a well-maintained nursery gives straight, thick seedlings, and those transplants establish in days instead of weeks.
Raise the bed about 15 cm above the path and leave paths of roughly 40 cm between beds. Till the surface to a fine tilth so the seedling can push through easily. Then draw shallow furrows with a stick or a shovel, because tomato seed must not be buried deep.
Next, sow the seed in those furrows, cover it lightly with soil, and mulch the surface with clean, disease-free grass to hold moisture. Water the bed regularly and watch for two failures: digging the seed out with a heavy watering can, and cutting rills through the bed. Sprouting typically comes within one to two weeks.
Keep the bed watered until the seedlings are ready, normally three to four weeks after sowing. Two rules protect the whole crop after this point. First, never sow into ground that grew tomatoes in the previous season. Likewise, never transplant a seedling that shows curling or a dark lesion on the stem.
Step 3: Prepare the beds and lay the drip line
Land preparation for tomato farming follows a simple order. Plough once along the field and once across it, which brings weed seeds and microbes to the surface where sunlight can act on them. Warmth then triggers those weed seeds, and a second pass, mechanical or hand-weeded, kills the flush before it matures.
Finish with a shallow plough that buries the dead growth, which rots down and adds organic matter. Level the beds to a uniform height so every plant reaches water at the same time. The full sequence sits in the land preparation guide for drip irrigation.
For bed size, one metre suits a short-season crop such as tomatoes, while 1.5 m beds serve perennial herbs. Keep paths between 40 and 50 cm so most of the land stays under cultivation. Form beds to a depth between 12 and 30 cm, breaking every clod so air and water move freely, then work manure into the soil.
Only after the bed is shaped does the line go down. Spacing, tape selection and run length for tomatoes under drip are set out on the shop page for tomato drip irrigation design, along with the take-off connectors, starters and end plugs that hold the layout together.
Step 4: Water the crop by growth stage
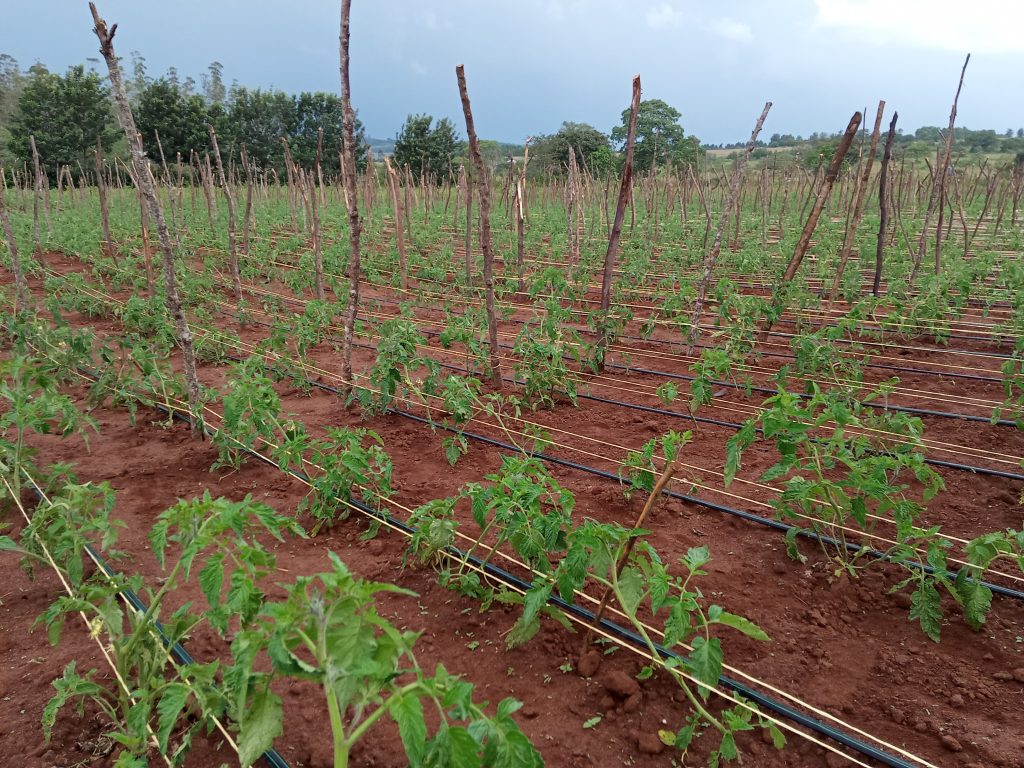
Water need is not flat across the season, and a tomato crop shows that clearly. FAO irrigation guidance splits the crop into four stages, typically 30 days initial, 40 days development, 40 to 50 days midseason and 25 to 30 days late, for a total of 135 to 155 days.
The same source gives the crop coefficient for tomatoes as about 0.60 at the start, 1.15 through midseason, and 0.70 to 0.90 at the end. A staked crop that reaches 1.5 to 2 m uses the higher figure of 1.20. Multiply the stage coefficient by local reference evapotranspiration and you have the daily water need of that bed.
In practice, that arithmetic explains why a crop three weeks after transplanting can look thirsty one week and waterlogged the next. The demand curve rises steeply as the canopy closes. Then it falls again once the fruit begins to colour, which is when many growers over-water and lose firmness.
Taper the last stage instead of stopping water outright. A dry-down that is too fast splits fruit and shortens the harvest window. For the same reason, check the bed with a moisture meter instead of a calendar, and record the reading each week.
Step 5: Feed the crop through the season
Fertigation is where drip earns its cost in tomato farming. Nutrients travel with the water straight to the active root hairs, so small doses applied often beat one heavy band dressing at planting.
Keep the doses small and frequent. A concentrated weekly shot wastes fertiliser and risks salt build-up at the emitter, where the wetting pattern is narrowest. Phosphorus moves poorly in soil, which is another reason to place it at the root in solution instead of broadcasting it.
Watch calcium and moisture together. Blossom-end rot, the black patch at the fruit bottom, is a calcium transport failure, and uneven watering is what usually causes it. Feeding more calcium into a crop that is allowed to dry and then flood does not fix the problem. Steady moisture moves calcium into the fruit.
Step 6: Stake, prune, harvest and handle
Indeterminate crops need support, and staking changes the whole harvest. A plant trained up a stick or string keeps fruit off the soil, which cuts rots and makes picking faster. Prune to one or two stems so the plant puts effort into fruit instead of leaf.
Pick for the distance. Fruit for a long haul should come off at the breaker stage, when colour first shows, and be crated out of direct sun. Fruit for the gate can go riper. Handle crates gently, because a bruised tomato sells at half the price and spoils the crate around it.
Cool the harvest before it travels. Shade, ventilation and a clean crate do more for shelf life than any packing trick. Kilele F1 is bred for roughly three weeks of shelf life, and that window only holds if the fruit is picked clean and kept cool.
Mistakes that cut tomato farming yields
Six mistakes account for most of the lost yield in tomato farming, and every one is visible before it costs money.
- Burying seed deep in the nursery, so germination is patchy and the bed is uneven.
- Transplanting leggy seedlings that flop and root at the wrong depth.
- Planting into ground that held tomatoes last season, which carries wilt and nematodes.
- Laying drip line without end plugs or a flush point, then blaming the emitter for a blockage.
- Watering on a fixed calendar through the stage change at flowering.
- Picking fully ripe fruit for a long trip to market instead of harvesting at colour change.
How tomato farming fits a drip budget
Tomato farming pays for irrigation earlier than most crops, because a short cycle returns capital within the season. The budget question is not whether to install drip but how much of the field to equip at once.
Size the layout to the planted area, not to the pump outlet. A mainline that is oversized for the beds wastes money on the first season, while a tape run that is too long loses uniformity at the far end and drags the whole block’s yield down. The drip installation guide covers that sizing step, and the irrigation pipes page lists the mainline options.
Under cover, the same logic applies with one extra variable. Protected crops carry a higher fixed cost, so the water plan has to be right before the structure goes up. The greenhouse crop guide shows how a covered block is planned bed by bed.
Frequently asked questions about tomato farming
How deep should tomato seed be sown? Shallow. Draw a furrow with a stick, drop the seed, and cover it lightly. Deep burial is the most common reason a nursery bed germinates unevenly.
When is a seedling ready to transplant? Usually three to four weeks after sowing, when the stem is thick and the plant is short. Transplant in the cool part of the day and water the bed the same hour.
What spacing should I use under drip? Spacing follows the tape and the bed, not a rule of thumb. The tomato drip irrigation design page sets out emitter spacing and run length for greenhouse and open-field beds.
How often should I irrigate a tomato crop? By stage, not by habit. A crop at midseason needs far more per day than the same plant three weeks earlier, and the FAO stage figures above show where that curve turns.
Why do the bottoms of my fruit turn black? That is blossom-end rot, a calcium transport failure driven by uneven moisture. Level out the watering before you change the fertiliser.
Can determinate varieties be staked? They can, and staking keeps fruit off the soil even on a short plant. The real reason to stake is an indeterminate crop that would otherwise trail and rot.
Which is better for a first block, hybrid or open-pollinated seed? Hybrid, because germination and disease tolerance are predictable. It costs more per gram, and that premium is the reason to record the lot number on the bed.
Talk to Eunidrip Irrigation Systems on +254 728 163329 with your altitude, your market distance and the size of the block, and the layout can be drawn around those three answers.